
How to Bisect an Angle
|
To bisect is to cut into two equal halves. In geometry, bisecting an angle means dividing the angle into two equal angles. To consider how to bisect an angle, start with the meaning of the word 'bisect'. To bisect is to divide into two equal pieces. When bisecting an angle, one constructs a bisector. A bisector is something that cuts an object into two equal pieces. The bisector that will be constructed is halfway between the two line segments or rays that define the angle. The bisector is the same distance from each of the legs of the angle. Whenever you hear 'same distance', think 'circle' and 'arc'. A circle is all points that are the same distance from a center point. The bisector will be drawn using a compass to draw circles, and a straightedge to draw the bisector. | |||
|
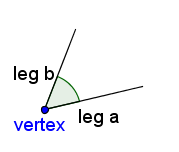
Figure 1 shows a angle that is ready to bisect. | ||
|
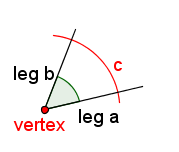
Draw an arc using the compass. Put the point of the compass on the vertex of the triangle. Make sure the arc is small enough to intersect both legs of the angle. Draw an arc that intersects both legs of the angle. Label this arc 'c'. | ||
|
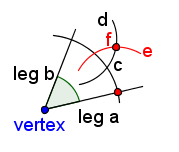
Now you will be drawing two arc with the same radius. Since the radii are the same, each arc will be the same distance from the legs of the triangle. Put the point of the compass on the intersection of arc c and leg b. Adjust the size of the compass so that it will not be too big. Draw an arc that passes through the center of the area between the legs of the angle. Label this arc 'd'. | ||
|
Without changing the size of the compass, place the point on the intersection of arc c and leg a. Draw an arc that intersects arc d. Label the new arc 'e'. Label the intersection of arcs d and e as 'f'. | ||
|
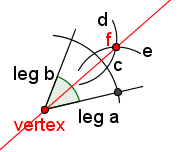
Point f is halfway between the two legs of the angle. So is the vertex. Now use the straightedge to draw a line through the vertex and point f. This new line is the angle bisector. | ||

Manipulative 1 shows interactively how to construct the bisector of an angle.
|
Click on the blue points and drag them to change the figure. Click on the point on the slider and drag it to see each step. |
| Manipulative 1 - How to Bisect and Angle Using Geogebra. Created with GeoGebra. |
Cite this article as:
McAdams, David E. How to Bisect an Angle. 4/22/2019. All Math Words Encyclopedia. Life is a Story Problem LLC. https://www.allmathwords.org/en/h/howtobisectanangle.html.Image Credits
- All images and manipulatives are by David McAdams unless otherwise stated. All images by David McAdams are Copyright © Life is a Story Problem LLC and are licensed under a Creative Commons Attribution-ShareAlike 4.0 International License.
Revision History
4/22/2019: Update equations and expressions to new format. (McAdams, David E.)7/6/2018: Removed broken links, updated license, implemented new markup, implemented new Geogebra protocol. (McAdams, David E.)
5/5/2010: Initial version. (McAdams, David E.)
- Navigation
- Home
- Contents
-
# A B C D E F G H I J K L M N O P Q R S T U V W X Y Z - Teacher Aids
- Classroom Demos
- How To
- LIASP
- LIASP Home
- Conditions of Use
- Privacy Policy
- Donate to LIASP
- Help build this site
- About LIASP
- Contact LIASP
All Math Words Encyclopedia is a service of
Life is a Story Problem LLC.
Copyright © 2018 Life is a Story Problem LLC. All rights reserved.
This work is licensed under a Creative Commons Attribution-ShareAlike 4.0 International License